
Have you ever found yourself staring at a Singer Samba 2 sewing machine, thread in hand, and wondered, “How do I conquer the threading challenge?” Well, do not worry, with the right guidance, you can easily thread this powerhouse and make sure everything is perfectly stitched.
The main goal of our guide is to provide an explanation of how Singer Samba 2 threading works. We’ve got everything you need to troubleshoot common machine problems and identify machine components. It is critical to master this skill in order to maximize the full potential of your sewing machine, whether you are a novice or an experienced sewist.
Learn how to troubleshoot threading machines and increase your confidence with these step-by-step instructions, practical tips, troubleshooting tricks, and a hands-on exercise. Through our services, you will experience an enjoyable sewing journey that will help you become more creative and precise.
Getting Started
In the realm of unleashing the full potential of the Singer Samba 2 sewing machine, the initial step – getting started – is akin to unlocking the gates to a world of seamless stitching mastery. As you embark on this journey, the first order of business is to meticulously identify the machine components that constitute the beating heart of your sewing companion.
Main Parts Breakdown:
The needle: This slender yet pivotal component serves as the guiding force, piercing through fabrics with precision. Understanding the different types of needles available and selecting the appropriate one for your project sets the stage for impeccable stitching.
Thread Spool: Imagine it as the lifeblood of your sewing venture, supplying the thread that intertwines with creativity. Ensuring a smooth flow from the spool, whether it be metallic, cotton, or nylon, guarantees an uninterrupted stitching symphony.
Tension Discs: In the intricate dance of threads, tension plays a key role. These discs regulate the tautness of the upper thread, a subtle yet critical adjustment that can make the difference between a flawless stitch and a frustrating tangle.
Bobbin: Nestled in the depths of the machine, the bobbin houses the lower thread, contributing to the delicate balance required for impeccable sewing. Winding it correctly is an art form in itself, ensuring uniformity in each loop.
Understanding the Machine’s Threading Diagram:
Now, armed with knowledge about the individual components, the next layer of mastery involves deciphering the machine’s threading diagram. This visual roadmap, often an intricate network of lines and arrows, serves as your navigational guide through the threading labyrinth.
Follow the Lines: Each line on the diagram is a pathway to precision. From the initial placement of the upper thread to the intricacies of bobbin threading, these lines demystify the sequence, ensuring a seamless interplay of threads.
Arrows of Guidance: The arrows on the diagram are not mere embellishments; they are the directors of your sewing orchestra. They indicate the direction in which the thread should flow, preventing any missteps that might lead to tension issues or, worse, a halted operation.
Decode Symbols: Threading diagrams are laden with symbols, each carrying specific instructions. Understanding these symbols is akin to deciphering a secret code – a skill that elevates your threading game to an art form.
Expert Tips for a Smooth Start:
Patience is Your Virtue: Rushing through the identification process is the cardinal sin of threading. Take the time to acquaint yourself with each component and understand its role in the grand sewing scheme.
Invest in Quality: From needles to thread spools, opt for quality over quantity. A well-chosen arsenal of sewing materials enhances the overall experience and ensures longevity for your Singer Samba 2.
Threading in Natural Light: A seemingly trivial yet impactful tip – thread your machine in natural light. This reduces the chances of overlooking details and facilitates a clearer understanding of the threading process.
The Art of Machine Mastery:
In essence, the journey of getting started with the Singer Samba 2 is a meticulous dance with machine components and a symbiotic understanding of the threading diagram. This initial phase, though seemingly routine, lays the foundation for a seamless and rewarding sewing experience. Approach it with the precision of a maestro, and soon you’ll be orchestrating stitching symphonies with the finesse of a seasoned virtuoso.
Preparation

III. Preparation: Setting the Stage for Stitching Success
In the intricate dance of sewing, the often-overlooked phase of preparation can be likened to tuning instruments before a symphony. This pivotal step is where the groundwork for seamless stitching is laid, ensuring that every subsequent motion is harmonious and precise.
Gathering Necessary Materials:
Before diving into the threading intricacies of the Singer Samba 2, the first commandment of preparation is to gather the necessary materials. Think of it as a ritualistic gathering of tools before embarking on a creative journey.
Suitable Thread: The lifeblood of any sewing endeavor, the choice of thread is paramount. Opt for a thread that aligns with your fabric type and the demands of your project. From cotton to polyester, the market offers an array of options, each contributing a unique texture to your final creation.
Bobbins: These small, inconspicuous spools house the lower thread and play a crucial role in achieving balanced tension. Ensuring you have an ample supply of bobbins, wound uniformly with the chosen thread, sets the stage for uninterrupted stitching.
Ensuring Machine Safety:
In the rush of creative anticipation, it’s easy to overlook the mundane yet essential aspect of safety. Before threading commences, the machine must be in a state of dormancy, akin to a vigilant guardian standing by until summoned for action.
- Machine Shutdown: Picture this as the calm before the storm – ensuring the machine is turned off not only safeguards the user but also prevents any accidental mishaps during the threading process. It’s a simple yet often neglected precaution that forms the backbone of responsible sewing.
The Thread’s Tale: Choosing the Right Spool
In the realm of sewing, the thread is not merely a functional component but a storyteller, weaving narratives through stitches. Understanding the nuances of thread types is akin to selecting the right pen for a masterpiece.
Cotton for Comfort: If your creation cradles the skin, opt for cotton threads. Soft and breathable, they marry comfort with durability, making them ideal for garments that embrace the body.
Polyester for Endurance: For projects that withstand the test of time, polyester threads step into the spotlight. Resilient and resistant to fading, they ensure your stitches endure the wear and tear of daily use.
The Bobbin Ballet: Winding for Harmony
In the delicate ballet of threads, the bobbin takes center stage, dictating the tempo of the lower stitch. Winding it correctly is not just a mechanical task; it’s a dance of precision that ensures the threads move in perfect synchronization.
Uniform Winding: Imagine the bobbin as a meticulous conductor ensuring each loop is wound uniformly. Irregular winding introduces disharmony into the stitching symphony, leading to tension issues and potentially unraveling the entire performance.
Tension Check: Before the bobbin takes its place in the machine, a quick tension check ensures that the lower thread is wound with just the right amount of resistance. It’s the subtle calibration that prevents stitches from puckering or bunching.
In essence, the preparation phase is the silent overture to a sewing masterpiece. It’s the backstage hustle before the grand performance, where the seemingly mundane act of gathering materials and ensuring machine safety lays the foundation for stitching excellence. So, as you stand at the precipice of creativity, thread in hand, remember that success is not just in the stitches but in the meticulous preparation that precedes them.
Threading the Upper Thread
IV. Threading the Upper Thread: Crafting the Tapestry of Precision
In the intricate ballet of sewing, threading the upper thread of the Singer Samba 2 is akin to the delicate choreography that precedes a grand performance. This process, though seemingly routine, is the heartbeat of precision stitching, and mastering it transforms the act of sewing into a symphony of creativity.
Step-by-Step Guide to Threading the Upper Thread:
Inserting the Thread Through the Needle Eye:
Precision Prowess: Commence the threading odyssey by deftly inserting the thread through the needle eye. Think of it as threading a needle in the dark—a moment that demands precision and finesse.
Eye of the Needle Elegance: This step is more than a mere mechanical task; it’s a dance of intricacy. Align the thread with the eye, letting it glide through effortlessly like a seasoned performer taking center stage.
Guiding the Thread Through Tension Discs:
Tension Tango: Navigate the next move by guiding the thread through the tension discs. It’s a nuanced dance, akin to adjusting the volume on a delicate melody. Too tight, and the stitches may rebel; too loose, and the harmony is lost.
Balancing Act: Picture the tension discs as the scales of justice for your stitches. A gentle glide through ensures an equilibrium that prevents thread snarls and guarantees a smooth sewing sonata.
Properly Placing the Thread Through Thread Guides:
Guidepost of Precision: As you reach the final act, the thread guides, think of them as the guiding lights illuminating your path to perfect stitches. Proper placement ensures that your thread follows the designated route with grace.
Thread Maze Mastery: Navigating the thread guides is not unlike maneuvering through a maze. Each twist and turn has a purpose, guiding the thread to its final destination with the finesse of a seasoned navigator.
Expert Tips for Threading Elegance:
Mindful Tension Checks: Periodically, pause to check the tension, ensuring that the upper thread flows seamlessly. A quick tension check is the guardian against potential stitching discord.
Lighting Matters: Threading is an art best performed in good light. Adequate illumination reduces the risk of overlooking details, turning what could be a tedious task into a visual masterpiece.
The Artistry of Threading Mastery:
In essence, threading the upper thread is a meticulous dance of precision and finesse. It’s not just about mechanics; it’s about infusing each movement with intention. The needle becomes your brush, and the thread, your paint, as you craft a tapestry of stitches that resonate with precision and creativity. So, as you embark on this threading journey, remember that each step is a note in the symphony of sewing mastery, and with each threaded needle, you compose a masterpiece.
Threading the Bobbin
V. Threading the Bobbin: Crafting the Foundation of Stitching Harmony
In the intricate world of sewing, threading the bobbin of the Singer Samba 2 is akin to setting the stage for a flawless performance. This seemingly mundane task is the cornerstone of stitching harmony, where the details of placement, tension, and even winding contribute to the symphony of perfect stitches.
Detailed Instructions for Threading the Bobbin:
Placing the Bobbin in the Bobbin Case:
Case in Point: Begin the bobbin threading journey by placing it in the bobbin case. Think of the bobbin case as the guardian of the lower thread, ensuring it unravels with precision and grace.
Alignment Mastery: Align the bobbin in the case with a finesse akin to fitting puzzle pieces together. The snug placement is the first note in the harmonious composition of upper and lower threads.
Guiding the Thread Through the Bobbin Tension Slot:
Tension Dance: Navigate to the next step by guiding the thread through the bobbin tension slot. This is not a mechanical task; it’s a dance with tension, ensuring the lower thread meets the upper thread in a perfectly synchronized waltz.
Slot Symphony: Picture the tension slot as a key player in the symphony of stitches. A smooth guide through this slot is the assurance of balanced tension, preventing the disharmony of loose or overly tight stitches.
Winding the Bobbin Evenly:
Even Steven Winding: The final act in this threading trilogy is winding the bobbin evenly. Visualize it as the meticulous winding of a music box—each turn contributing to the overall melody of stitching perfection.
Uniformity Matters: Even winding ensures that the thread layers on the bobbin are uniform, preventing irregular tension and guaranteeing a smooth flow. It’s the secret sauce to achieving stitches that stand the test of time.
Expert Tips for Bobbin Mastery:
Tension Test Swatch: Before unleashing the bobbin into full stitching mode, conduct a tension test swatch. It’s the litmus test ensuring that the upper and lower threads dance in perfect harmony.
Regular Bobbin Checks: Make bobbin checks a habit during extended sewing sessions. An occasional glance ensures that the bobbin is consistently contributing its part to the stitching symphony.
The Symphony of Bobbin Mastery:
In essence, threading the bobbin is not just about mechanics; it’s about composing a symphony of stitches. Placing the bobbin, guiding it through tension slots, and winding it evenly are not mundane tasks but delicate movements in a dance of precision. As you thread the bobbin of your Singer Samba 2, envision each step as a musical note, contributing to the masterpiece of stitching that awaits. So, as you embark on this journey, remember that the foundation of perfect stitches lies in the meticulous threading of the bobbin—a task that transforms sewing from a task into an art.
Bobbin Case Placement
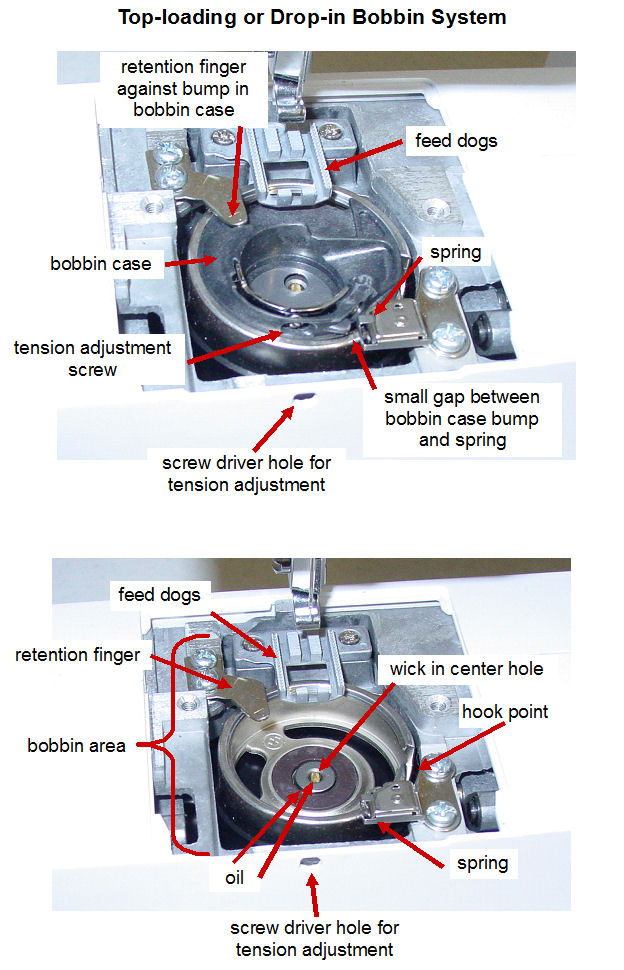
VI. Bobbin Case Placement: The Dance of Precision in Sewing Mastery
In the intricate world of sewing, the artistry extends beyond the mere act of stitching to the meticulous placement of the bobbin case in the Singer Samba 2. This often-overlooked step is the linchpin of the entire sewing symphony, where correct positioning ensures the seamless interplay of upper and lower threads, giving life to every stitch.
Correctly Positioning the Bobbin Case in the Machine:
Ensuring the Bobbin Rotates Counterclockwise:
Counterclockwise Choreography: Picture the bobbin as the heartbeat of the sewing machine, and its rotation direction sets the rhythm for the stitches. Ensuring the bobbin rotates counterclockwise is not a trivial detail; it’s the choreography that prevents thread tangles and ensures smooth stitching pirouettes.
Preventing Tension Tango: A counterclockwise rotation aligns with the natural flow of the upper thread, preventing a tension tango that could lead to uneven stitches or, worse, a complete stitching standstill. It’s a directional choice that transforms the bobbin into a partner in perfect sewing harmony.
Securing the Thread in the Bobbin Case Groove:
Groove Guardianship: The bobbin case groove is more than a resting place for the thread; it’s a guardian ensuring the lower thread unravels with the precision of a disciplined dancer. Securing the thread in this groove is the final act before the grand performance, where each loop contributes to the elegance of the stitch.
Preventing Snarls: Imagine the bobbin case groove as a guide rail preventing the thread from straying into chaotic territories. A securely placed thread in this groove is the assurance against snarls, knots, and the frustration that comes with interrupted stitching.
Expert Tips for Bobbin Case Mastery:
Regular Checks: Before each sewing session, make it a ritual to check the bobbin case positioning. This quick moment of scrutiny ensures that the foundation for flawless stitches is securely in place.
Cleaning Routine: Incorporate a cleaning routine into your sewing habits, paying special attention to the bobbin case area. A clean and debris-free environment enhances the bobbin’s performance, contributing to the longevity of your sewing machine.
The Symbiosis of Bobbin Placement:
In essence, correctly placing the bobbin case in the machine is not a mechanical routine but a dance of precision, where each movement contributes to the seamless performance of the Singer Samba 2. As you embark on this journey, envision the bobbin as a partner in a waltz, with its counterclockwise rotation and securely placed thread in the groove ensuring that every stitch is a step towards sewing mastery. So, whether you are a novice or a seasoned sewist, remember that the artistry of sewing extends beyond the visible stitches to the nuanced placement of the bobbin—a task that transforms every sewing session into a choreography of elegance and precision.
Bringing Threads Together
VII. Bringing Threads Together: The Culmination of Stitching Symphony
In the intricate ballet of sewing, the artistry extends beyond the mechanics of the machine to the delicate task of bringing threads together on the Singer Samba 2. This pivotal step marks the convergence of the upper and lower threads, transforming a series of loops into a seamless symphony of stitches that breathe life into your creative endeavors.
Connecting the Upper and Lower Threads:
Drawing Up the Bobbin Thread:
Bobbin Ascension: Initiating the dance of threads involves drawing up the bobbin thread. Picture it as coaxing a shy partner onto the dance floor; a gentle tug on the upper thread brings the bobbin thread to the surface, setting the stage for their synchronized performance.
Tension Balance: The act of drawing up the bobbin thread is not just a mechanical feat; it’s a calibration of tension. Achieving the right balance ensures that both threads contribute equally to the stitching tableau, preventing the discord of uneven tension.
Securing Both Threads Under the Presser Foot:
Presser Foot Pas de Deux: With the bobbin thread now in harmony with its upper counterpart, the next step is securing both threads under the presser foot. Think of it as the grand finale, where the threads join forces before embarking on their journey across the fabric canvas.
Presser Foot Grip: The presser foot acts as the conductor, orchestrating the movements of the threads as they intertwine in a synchronized dance. Ensuring both threads are securely under its grip guarantees a smooth passage, preventing any wayward loops or skipped stitches.
Expert Tips for Thread Unity:
Pre-Stitch Test: Before delving into your main project, conduct a pre-stitch test. This not only checks the unity of the threads but also serves as a rehearsal for the stitching performance ahead.
Thread Quality Matters: The quality of your threads is not just a matter of aesthetics; it’s a pragmatic consideration. Invest in high-quality threads to ensure they play well together, minimizing the risk of breakage or tension issues.
The Culmination of Stitching Symphony:
In essence, bringing threads together is not a mere mechanical step but the culmination of the stitching symphony. As you draw up the bobbin thread and secure both threads under the presser foot, envision it as the grand finale where individual notes meld into a harmonious composition. So, whether you are creating garments, quilts, or intricate crafts, remember that the beauty of your creation lies not just in the stitches but in the meticulous act of bringing threads together—an art that transforms sewing into a symphony of creativity.
Checking for Tension
VIII. Checking for Tension: The Art of Stitch Harmony
In the meticulous craft of sewing, achieving the perfect stitch is an art form, and the key to this artistry lies in mastering the delicate dance of thread tension. The Singer Samba 2, a symphony of engineering, invites you to become not just a sewist but a conductor, ensuring that each stitch resonates with precision and elegance. Here’s a guide on how to check and adjust thread tension, transforming your sewing machine into a harmonious orchestra.
How to Check and Adjust Thread Tension:
Testing Stitches on a Scrap Fabric:
Fabric Ensemble: Begin the tension odyssey by selecting a scrap fabric that mimics the material of your main project. Just as a musician tunes their instrument, this step ensures your machine is attuned to the specific demands of the fabric composition.
Stitch Sampler: Create a stitch sampler on the chosen fabric, incorporating various stitch types and lengths. This sampler is your musical score, allowing you to discern any disharmony in tension that might disrupt the fluidity of your stitches.
Observation Stage: Observe the stitches closely. Ideally, both the upper and lower threads should meet at the midpoint of the fabric. If the threads pull to the top or bottom, it signals tension discord, and adjustments are warranted.
Making Tension Adjustments as Needed:
Tension Control Panel: Every sewing virtuoso must acquaint themselves with the tension control panel of their machine. Think of it as the conductor’s podium, offering control over the delicate interplay of upper and lower threads.
Incremental Adjustments: Tension adjustments are not a one-size-fits-all affair. Make incremental adjustments, turning the tension dial or knob gradually. Picture it as fine-tuning the pitch of a musical instrument—one small turn can make a significant difference.
Retesting Harmony: After each adjustment, retest your stitches on the fabric sampler. It’s a dynamic process of trial and error, refining the tension settings until the stitches align in perfect unity. This iterative approach ensures that you don’t overshoot the mark and end up with overly tight or loose stitches.
Expert Tips for Tension Mastery:
Thread Quality Matters: High-quality threads are the unsung heroes of tension mastery. Invest in threads that glide smoothly through the machine, minimizing the risk of tension-related hiccups.
Regular Maintenance: Treat your sewing machine to regular maintenance sessions. Cleanliness in the bobbin area and around the tension discs is crucial for preventing disruptions in the stitching symphony.
The Symphony of Stitch Harmony:
In essence, checking and adjusting thread tension is not just a technicality but a symphony of stitch harmony. As you navigate the tension control panel and fine-tune your machine’s settings, envision yourself as the conductor of an orchestra, coaxing each thread to play its part in perfect unity. So, whether you are crafting garments, quilts, or intricate projects, remember that the beauty of your creation lies not just in the stitches but in the meticulous control of thread tension—an art that transforms sewing from a task into a masterpiece of precision and elegance.
Troubleshooting Tips
IX. Troubleshooting Tips: Navigating the Stitching Maze with Finesse
Embarking on a sewing project is akin to setting sail on a creative journey, but as any seasoned sewist knows, even the smoothest seas can harbor unexpected challenges. Enter the troubleshooter’s guide for the Singer Samba 2, a compass through the common threading woes that may arise, offering solutions to ensure your sewing odyssey remains a course of creativity rather than a struggle against technical tides.
Common Threading Issues and Solutions:
Thread Bunching:
Bobbin Checkup: The culprit behind thread bunching often lurks in the bobbin area. Ensure the bobbin is correctly wound and inserted, with the thread flowing smoothly. A misbehaving bobbin can quickly turn your stitching serenity into a tangled mess.
Thread Quality Matters: Low-quality thread is a silent saboteur. Invest in threads known for their smooth texture and durability, reducing the likelihood of snags and bunching. Think of it as providing your machine with the best tools for a seamless performance.
Breaking Needles:
Needle Selection: The choice of needle is pivotal to preventing needle breakage. Select a needle that corresponds to the fabric you’re working with, considering factors like fabric weight and type. It’s the difference between a needle effortlessly gliding through fabric and one meeting unnecessary resistance.
Needle Alignment: A bent or misaligned needle spells trouble. Before each project, inspect the needle for any signs of wear or deviation from its straight path. Regular needle changes, especially after tackling dense fabrics, can prevent unexpected breakages.
Uneven Stitches:
Tension Troubles: Uneven stitches often signal tension discrepancies. Revisit the tension control panel, adjusting as needed. Picture it as a fine-tuning session, bringing both upper and lower threads into harmonious alignment. A balanced tension is the secret sauce for picture-perfect stitches.
Thread Quality Redux: The thread quality saga continues with uneven stitches. Inconsistent thread thickness can disrupt the stitch formation. Opt for threads that boast uniformity, minimizing the risk of sudden variations that may throw off the stitching equilibrium.
Expert Tips for Smooth Sailing:
Regular Machine Maintenance: Treat your sewing machine to regular maintenance sessions. Cleaning out lint, oiling the necessary parts, and ensuring all components are in top condition lay the foundation for trouble-free stitching.
Project-Specific Adjustments: Tailor your machine settings to the demands of each project. A small tweak in tension or needle choice can make a substantial difference. Consider it as adapting your machine to the unique challenges posed by different fabrics.
Mastering the Stitching Maze:
In the intricate dance of sewing, troubleshooting becomes an art form, transforming challenges into opportunities for mastery. As you navigate the realms of thread bunching, breaking needles, and uneven stitches, envision yourself not as a victim of technical glitches but as a captain steering through the stitching maze with finesse. So, whether you are a novice sewist or a seasoned pro, may these troubleshooting tips serve as your compass, guiding you through the labyrinth of common threading issues and ensuring your sewing machine remains a reliable vessel on your creative voyage.
Maintenance
X. Maintenance: Nurturing Your Sewing Companion for Lifelong Performance
In the realm of sewing, where precision is paramount and each stitch tells a story, the longevity and optimal performance of your Singer Samba 2 hinge on a simple yet crucial practice – maintenance. Treating your sewing machine to regular upkeep is akin to providing it with the care and attention it deserves, ensuring that it remains a reliable companion on your creative journey. Here’s a comprehensive guide on the art of maintenance, delving into the nuances of cleaning, tightening, and safeguarding the intricate components that make your sewing experience seamless.
Regular Upkeep for Optimal Performance:
Cleaning the Machine:
Lint Patrol: Like a vigilant custodian, embark on regular lint patrol sessions. Lint, the silent saboteur, can accumulate in the bobbin area and around the feed dogs, hampering the smooth movement of components. A gentle brush and the strategic use of a lint roller become your tools of choice in this cleanliness crusade.
Oil Application: Treat your machine to periodic oiling, targeting the designated points outlined in the user manual. Just as a well-oiled engine ensures smooth operation, a well-lubricated sewing machine guarantees that each stitch is executed with finesse. Remember, moderation is key; excessive oiling can be as detrimental as neglect.
Checking for Loose Screws or Parts:
The Tightening Ritual: A sewing machine is a symphony of screws, nuts, and bolts working in harmony. Regularly inspect these components, tightening any that may have loosened with the vibrations of extensive use. Imagine it as securing the foundation of a building – a stable base ensures the structure stands tall.
Alignment Assessment: Precision is paramount, and loose parts can throw your machine’s alignment off-kilter. Check the alignment of the needle, presser foot, and other crucial elements. Tighten or realign as needed, maintaining the machine’s structural integrity and accuracy.
Expert Tips for Prolonged Performance:
Scheduled Maintenance Calendar: Treat maintenance as a scheduled event rather than a reactive response to issues. Create a maintenance calendar, noting when each aspect – cleaning, oiling, and component checks – should be performed. Consistency is the key to a sewing machine’s prolonged performance.
User Manual Guidance: Your sewing machine’s user manual is not just a booklet; it’s a roadmap to effective maintenance. Consult it regularly for manufacturer-recommended practices, ensuring that your maintenance rituals align with the machine’s specific needs.
Nurturing Your Sewing Companion:
In essence, maintenance is not a chore but a gesture of appreciation for the silent artist that stitches your creative visions into reality. As you embark on the journey of cleaning and tightening, envision it as a nurturing ritual, a symbiotic dance between caretaker and machine. So, whether you’re a novice or a seasoned sewist, let the maintenance of your Singer Samba 2 be a testament to your commitment to the art of sewing – a commitment that ensures your machine remains a steadfast companion, ready to weave the threads of imagination into tangible works of art.
Practice Exercise
XI. Practice Exercise: Mastering Threading Skills with a Straight Stitch Showcase
Embarking on the journey of sewing is akin to mastering an art form, and at the core lies the fundamental skill of threading. To elevate your threading proficiency and cultivate a seamless sewing experience with your Singer Samba 2, a purposeful practice exercise becomes your secret weapon. This practice is not just a routine; it’s a deliberate act of honing your craft, transforming your sewing machine into an extension of your creative prowess.
A Simple Sewing Exercise to Practice Threading Skills:
Sewing a Straight Line on Scrap Fabric:
Material Selection: Begin by selecting a piece of scrap fabric – a canvas for your creative aspirations. This can be any spare fabric you have on hand, allowing you to focus solely on the threading and stitching process without the pressure of a final product.
Thread Choice: Opt for a contrasting thread color to make your stitches more visible. This choice serves a dual purpose: not only does it enhance the aesthetic appeal of your practice piece, but it also allows you to scrutinize and refine your threading technique with greater clarity.
Needle Insertion: Start by correctly inserting the needle through the eye, ensuring it’s securely in place. This seemingly simple step sets the stage for the precision required in threading, setting the tone for the journey ahead.
Guiding Through Tension Discs: Thread your machine, paying close attention to the meticulous process of guiding the thread through the tension discs. This step is the heartbeat of your sewing machine, dictating the balance between loose and tight stitches.
Navigating Thread Guides: Traverse the intricate path of thread guides, understanding their role in directing the thread’s trajectory. Each guide contributes to the overall stability of the thread, a symphony of coordinated movements essential for flawless stitching.
Executing the Straight Stitch: Once threaded, position your fabric under the presser foot and lower it. Engage in the rhythmic dance of the foot pedal, guiding the fabric with a steady hand. The objective is simple yet profound – sew a straight line that echoes precision and control.
Unlocking Threading Mastery:
Repetition is Key: Like any skill, mastery comes with repetition. Engage in this threading exercise regularly, transforming it into a ritual that refines your technique and transforms your machine into an extension of your creative mind.
Observation and Adjustment: As you sew, keenly observe the tension, stitch length, and overall performance. Don’t shy away from making real-time adjustments. This exercise is a dialogue between you and your machine – an ongoing conversation that evolves with each stitch.
The Artistry in Threading:
In essence, this practice exercise transcends the mechanical act of threading; it is an exploration of the artistry embedded in sewing. The straight line you sew on that scrap fabric becomes a testament to your evolving skills, a canvas that captures the nuances of your craftsmanship. As you engage in this intentional practice, envision your sewing machine not just as a tool but as a partner in your creative journey, faithfully translating your vision into meticulously threaded reality.
Key takeaway
Threading your Singer Samba 2 sewing machine is more than just a mechanical necessity; it also improves your sewing skills. In the weeks that followed the complexities of inserting the upper and lower threads, adjusting tension, and troubleshooting hiccups, you’ve made significant progress in mastering this fundamental skill.
You must practice for perfection to be successful. To learn how to make flawless stitches, you must first embrace the rhythm of the process, not just comprehend its technicalities. Keeping your sewing companion on a regular schedule ensures the longevity and peak performance of its work.
As you work your way through this process, envision the multitude of possibilities that each stitch will bring. Take your new skills and turn them into canvasses for your artistic expression, allowing you to create a canvas that can never be duplicated. Your Singer Samba 2 will continue to be an excellent tool for creating your visions, and I wish you the best of luck with your sewing.